As an Amazon Associate, we earn from qualifying purchases. Some links on this site are affiliate links at no extra cost to you. Our recommendations are based on thorough research and editorial judgment.

How to Caulk Large Gaps (Backer Rod and Layering Basics)
Have you ever looked at a big gap in your home and thought, “How in the world do I fix that?” Don’t worry; you’re not alone. Caulking large gaps might seem daunting, but it can be simple if you follow a few steps.
Start by gathering your tools. You’ll need a caulking gun, a utility knife, backer rods for those gaps over half an inch, and some top-notch silicone. Next, check the surfaces you’re working on. Make sure they’re clean and dry—this part is crucial because it ensures the caulk will stick well.
Now comes the fun part. Insert those backer rods carefully into the gap. You want to fill it up, but not all the way to the top—leave some space for the silicone. Apply thin layers of silicone, letting each one dry before adding the next. It’s all about building up to a smooth finish.
Avoid rushing this process. Common mistakes like skipping surface prep or applying way too much caulk can lead to a messier job than you bargained for. So, take your time!
Wrapping this up, caulking those big gaps doesn’t have to be a headache. When it’s done right, you’ll not only keep the drafts out but also improve the look of your space.
What project are you thinking about tackling next?
Key Takeaways
- Start by cleaning and drying surfaces thoroughly to ensure optimal adhesion for the caulk.
- Insert backer rods in gaps larger than ½ inch for support and to prevent sagging.
- Apply silicone in thin layers, allowing each layer to dry before adding more for better adhesion.
- Use a smoothing tool or a moistened finger to create a neat finish on the applied caulk.
- Remove masking tape while the silicone is still wet to achieve crisp, clean edges.
Why You Should Care About Caulking Large Gaps

Have you ever noticed those annoying gaps around your windows or doors? It might seem like a small issue, but caulking those large gaps is important for a bunch of reasons that can really improve your home.
First off, sealing those gaps helps keep moisture out. If water seeps in, it can cause a whole array of problems, from mold to structural damage. By taking the time to caulk properly, you’re not just saving yourself a headache—you’re also protecting your home from costly repairs in the future.
You might be surprised to know that caulking can also save you money. Sealing gaps properly can help cut down on energy loss, which is great news for your utility bill! Estimates suggest that you could potentially lower your costs by 10-20% just by doing some simple caulking.
And let’s not forget about comfort. Big gaps can let in cold drafts or, worse, pests and allergens from outside. By sealing those spaces, you’ll notice a more comfortable indoor environment, free from those unwanted visitors and less dust floating around.
Here’s the trick: using backer rods when you caulk not only helps with control, it also ensures a better seal. This means the caulk sticks better and lasts longer, giving you peace of mind that you’re making a solid improvement.
Plus, there’s an aesthetic element to consider. Filling in those gaps gives your house cleaner lines and better curb appeal. Who doesn’t want their home looking its best?
For the best results, choosing a caulk with high flexibility will help accommodate movement and temperature changes, ensuring a more durable seal.
What Tools and Materials Do You Need for Effective Caulking?

Have you ever looked at a giant gap in your home and thought, “I really need to fix that”? Tackling those larger gaps can feel overwhelming, but having the right tools and materials can make it a breeze. Let’s dig into what you’ll need to get this task done without a hitch.
Essential Tools:
- First off, a caulking gun is a must. Without a good one, you’ll struggle to apply silicone evenly, so it pays to invest in a quality option.
- Next, grab a utility knife or some scissors. You’ll use these to size backer rods and trim caulk tubes so they fit your gaps just right.
- Don’t forget about a smoothing tool. This little guy helps you create that polished finish on the caulk; trust me, it makes a big difference.
Materials:
- Here’s the trick: use masking tape to get those clean edges. It’s a simple way to keep excess silicone from ruining your hard work.
- If the gaps are over ½ inch, you’ll want some foam backer rods. They’re great for improving the adhesion of your caulk and stopping it from sagging.
- Lastly, pick a high-quality heavy-duty silicone. Waterproof silicone designed for exterior gaps is what you need to seal those spaces effectively.
Using the correct materials and tools is as essential as picking the right application methods to ensure a durable, professional finish.
So, why does this matter? Using the right tools and materials not only saves you time, but it also ensures a longer-lasting seal. Remember, taking the extra step to prepare makes the final result look incredibly sharp.
Ready to tackle that gap? You’ve got this!
Recommended Products

M18 Sausage Caulk Gun Kit
✅950 lbs. of dispensing force for the highest viscosity materials

M18 10 Oz Caulk Gun tool Only
How to Prepare Your Surface Before Caulking

Preparing your surface before caulking is crucial if you want that seal to stick around for a while. It might seem straightforward, but trust me, there are a few key steps that can make or break your project.
First off, you’ll want to clean out the gap thoroughly. Get rid of any dirt, dust, or old silicone leftovers. This makes sure that when you apply your new silicone, it’s got a clean surface to cling to.
Next, don’t forget to dry everything completely. You might not think moisture would play a big role, but it can seriously mess with how well the caulk bonds. So, dry it well!
Now, here’s a handy tip: lightly spritz the area with soapy water. This works wonders for cleaning and gives you some slip for a smoother application.
If you notice any rough edges, grab some sandpaper or a scraper to smooth them out. A consistent surface will make a huge difference with the final look of your caulk.
And if your gaps are bigger than half an inch, consider using backer rods. They’re a lifesaver for reducing depth and stopping the caulk from sagging.
Also, always ensure your surface is free from hard water spots, as these mineral deposits can prevent proper adhesion. This is why water spot removers might be necessary before beginning your caulking job.
Recommended Products
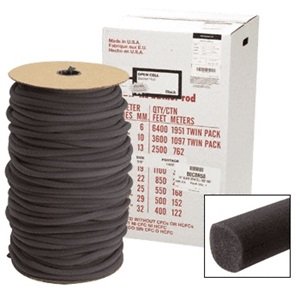
Open Cell, No Skin, Non-Gassing Rod is Compatible with All Cold-Applied Sealants

Closed-cell, non-absorbent Closed-cell, non-absorbent, Flexible, compressible Smooth skin backer rod
Applying Silicone With Backer Rods and Layers
Got a big gap that needs filling? You’re not alone! Many of us face those pesky spaces that seem to appear out of nowhere, especially around windows, doors, or even in some tricky corners. Here’s how to tackle that challenge.
First things first, make sure the surfaces are clean and dry. Once that’s sorted, you’ll want to use a backer rod for gaps wider than ½ inch. This isn’t just for support—it helps your silicone stick better and prevents any sagging over time. Cut the backer rod so it sits flush with the surface, which sets you up for a nice, even application of silicone.
When you start applying the silicone, go for thin, even layers. Don’t rush this part; let each layer dry before adding the next one. Why? If you pile it on too thick, you could end up with cracking later on, and nobody wants that! You want a solid, durable seal that’ll last.
For a clean finish, use a finishing tool or even your moistened finger to smooth out the silicone right away. And here’s a little tip: don’t forget to pull off any masking tape while the silicone is still wet. This little move makes it way easier to get those crisp edges that look professional.
In the end, it’s all about patience and attention to detail. So, next time you’re faced with those gaps, remember these tips. Using materials that provide waterproof seals ensures your repair holds up over time, especially in moisture-prone areas.
What gaps are you planning to tackle first?
Recommended Products

Closed-Cell Polyethylene Design: Durable, resilient closed-cell caulk saver foam with a water-resistant outer skin that helps resist punctures, moisture, and chemical exposure for long-lasting and reliable joint performance. This gap filler foam is highly flexible and easy to cut, yet highly resilient, ensuring an ideal fit in almost all spaces
Closed-Cell Polyethylene Design: Durable, resilient closed-cell caulk saver foam with a water-resistant outer skin that helps resist punctures, moisture, and chemical exposure for long-lasting and reliable joint performance. This gap filler foam is highly flexible and easy to cut, yet highly resilient, ensuring an ideal fit in almost all spaces

Closed-Cell Polyethylene Design: Durable, resilient closed-cell caulk saver foam with a water-resistant outer skin that helps resist punctures, moisture, and chemical exposure for long-lasting and reliable joint performance. This gap filler foam is highly flexible and easy to cut, yet highly resilient, ensuring an ideal fit in almost all spaces
Caulking Mistakes to Avoid
Caulking can seem simple enough, but if you’ve ever tackled it yourself, you know how quickly things can go sideways. Avoiding some common blunders can make a world of difference in achieving a lasting seal. Here are some key missteps to keep in mind:
- Skipping Surface Prep: Let’s start with the basics. If you don’t clean the surface beforehand, your caulk won’t adhere properly, and you’re setting yourself up for failure. Trust me; it’s worth taking a few extra minutes to wipe things down.
- Excessive Silicone: Think you need to slather on the silicone? Think again! Too much caulk can sag and cause uneven shrinkage over time, which means your seal won’t last as long as you’d like.
- No Backer Rod: Got gaps larger than ½ inch? You really should use a backer rod. Without it, the bond will be less reliable, and that’s not something you want to risk.
- Wrong Silicone Type: Here’s the trick: always choose waterproof silicone for areas prone to moisture. If you don’t, you might find your seal deteriorating way sooner than expected.
- Improper Smoothing: Are you skipping the smoothing step? It might seem trivial, but leaving your caulk rough can create visible gaps, which not only look bad but can also compromise the seal’s effectiveness.
So, why does all this matter? If you’re aiming for a finish that looks good and lasts, avoiding these mistakes is crucial. Remember, taking the time to prep and apply caulk correctly pays off in the long run.
Truth is, with just a little bit of care and attention, you can save yourself a lot of headaches down the road. Have you ever experienced a caulking mishap that left you frustrated?
Also, just like how corrosion inhibitors protect engine components to prolong their lifespan, using the right caulk and preparation helps ensure your seal holds up against environmental wear and tear.
Frequently Asked Questions
How to Fill Large Gaps With Backer Rod and Caulk?
To fill large gaps, we first place the backer rod firmly, creating a solid foundation. Then, we apply the caulk evenly, ensuring a smooth finish. Let’s embrace this task together for lasting results!
How to Fill Large Gaps Before Caulking?
To fill large gaps effectively, we should use best caulking materials and gap filling techniques, like inserting a backer rod for support and ensuring a clean, dry surface for better adhesion when applying caulk.
How to Fill a Large Gap Between a Wall and Baseboard?
To fill a large gap between the wall and baseboard, we can use foam backer rods and quality caulk, ensuring we choose suitable baseboard materials. This technique guarantees effective gap sealing for lasting results.
What Is the Maximum Gap for Caulking?
The maximum gap for effective caulking typically caps at 1 inch without backer rods. We should always respect these caulking limits to guarantee our projects remain durable and sealing integrity stays intact, preventing future issues.


